Back to School with Tuna Veggie Rolls!! Yummy sushi rolls made with canned tuna and veggies! Pack this colorful and healthy lunch for your kids!
I can’t believe my kids will be back in school in less than one week. It’s been a glorious and fun summer and even though I’m not looking forward to pulling them out of bed in the mornings, I am looking forward to getting back into a regular schedule. Hooray!
Back to school. Getting the kids ready and excited and packing school lunches. Do you pack one everyday? Now, I don’t pack lunch for my kids everyday. Sometimes, my kids actually prefer the hot lunches at school, but at the same time, they are also somewhat picky eaters so when the cafeteria is serving something that my oldest daughter doesn’t like, I whip up the packed lunch. Phoebe is only going into 2nd grade so I haven’t been packing lunches for that long but even in this last year, I’ve become more creative and have expanded the packed lunch repertoire to go beyond her favorite pasta, fish sticks and apple slices.
Tuna Veggie Rolls
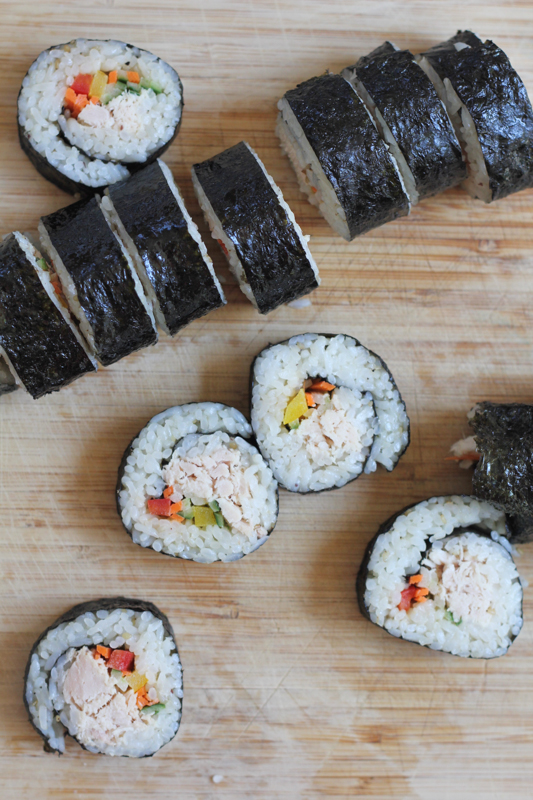
My kids love tuna and will eat it by itself by the spoonful. They are currently into eating rice rolls and love raw veggies . . so the Tuna Veggie Roll was born! This might look super complicated but it’s really not. When you get into the swing of it, these rolls can be made in a flash!


Canned tuna is the perfect way to add protein to your meal or snack. Canned tuna is a good source of essential nutrients, such as omega-3 fatty acids, high quality protein, selenium and Vitamin D. Most tuna species have approximately 2 grams of fat per 113 gram portion and less than 45 milligrams of cholesterol and sodium.

And here’s a bonus recipe for kids who like edamame.

Simply prepare your edamame as you normally would, either boiling them or placing them in the microwave until ready and then soak them in a mixture of soy sauce + sesame oil + a little salt + sesame seeds (and if you want a little kick, add some Shichimi Togarashi – Japanese Mixed Chili Pepper). You will never want to eat plain ole edamame again. Try this!
Tuna Veggie Rolls
Ingredients
Special equipment needed:
- A bamboo rolling mat
- Disposable gloves
- A small bowl of water
- A wood cutting board or other clean surface
- A sharp knife
For the rice:
- 2 cups cooked white medium grain rice; slightly cooled
- Sesame oil; start with 1 tablespoon
- Pinch of salt
- Roasted sesame seeds or seaweed gomasio to taste
For the rolls:
- 4 sheets dried roasted seaweed gim
- 2 cups cooked seasoned white medium grain rice
- 1 can albacore tuna drained and mixed with 1 tablespoon mayonnaise
- 1 yellow bell pepper thinly sliced, seeds removed
- 1 red bell pepper thinly sliced, seeds removed
- 1 large carrot peeled and julienned
- 1 seedless cucumber unpeeled and julienned
- serve with soy sauce
- Roasted sesame seeds
Instructions
- For the rice: Place cooked white rice into a large bowl and let cool for at least 10 to 15 minutes. Starting with 1 tablespoon, mix in the sesame oil and salt (or Seaweed Gomasio if using). Mix well and taste. Add just a touch more sesame oil if needed but do not overdo it. Your rice only needs a hint of sesame oil for taste. Sprinkle with sesame seeds, mix one last time and set aside.
- Step 1: Take one sheet of the dried gim and place onto your bamboo mat (make sure the bamboo sticks are horizontal). Spread about a ½ cup of cooked, seasoned rice onto 2/3 of the gim, spreading it evenly with your fingers. Tip: leave at least one inch uncovered (with no rice at all) at the top. This will help you to seal your roll at the end.
- Step 2: Lay in the tuna and then all of the ingredients (bell peppers, carrots and cucumbers) on top, leaving about an inch of exposed rice down at the bottom. Using the bamboo mat on the end closest to you, roll from the bottom up and over the ingredients (like you're rolling a sleeping bag), pressing down gently but firmly to make the fillings stay in. As you continue to roll, pull the mat up and straighten it so that it doesn’t get caught in the roll. Continue until you have reached the edge of the gim.
- Step 3: Using your fingers, dab just a little bit of water along the top seam of the dried seaweed and roll to seal it closed. Roll and gently squeeze one last time with the bamboo mat, set aside and continue with the other seaweed sheets.
- Step 4: When all of the rolls are finished, using a sharp knife, dip the knife into the water and lift the knife up so the water runs down the blade. This will help you to get a nice, clean cut. Slice each roll into about 8-10 pieces. Sprinkle on some sesame seeds, serve with soy sauce if desired and enjoy!
For detailed photos, more tips and a video on how to roll a rice roll, click here.
And since most of us are heading back to school soon (if you have not started school already) and might need some lunchbox inspiration, here are some tips that have helped me with my kids’ lunches.
My Tips for Packing Lunches
- Keep it simple.
- Keep it healthy and colorful.
- Personalize it.
- Bento box it.
- Change it up.
Keep it simple.
Remember, your child probably only has 15-20 minutes to actually eat so I say keep it simple. My kids like easy finger foods or things they can easily pop into their mouths. Have the fruits and veggies already sliced. And for you, Mom or Dad: prep the lunches the night before. Everything is ready and easier to pack up in the morning. Or, sometimes when I need to pack a lunch at the last minute, I just pack all of her favorite things. Easy peasy.
Keep it healthy and colorful.
The way our kids are learning to eat now is shaping them into how they will eat as adults. Let’s teach them by example. Eat healthy. Pack healthy. Now, of course, if given the option of a cookie or a carrot, my kids will go for the cookie. But I’ve always given them raw veggies to snack on so they eat those as well too. Kids love eating the colors of the rainbow. Keep the skin on those apples. Pack some raw veggies. Keep it colorful. You’d be surprised how your child’s eyes will light up in excitement.
Personalize it.
Leave a sticker or write a little note or card just to say “Hi”, “Have a great day” or “I love you.” It really brightens their day. And it gets even better when they are old enough and can actually read!
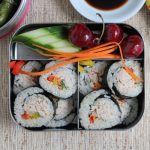
Bento Box it.
I really think kids love food more when it’s organized. My kids love food and food containers that have compartments. That’s why I love lunch containers that keep all the food separate. And this keeps it clean and fun for the kids. Remember, kids are visual too. Also, pay attention to the container. Is it easy to open? Make sure your child can open his or her lunch container with no problems.
Change it up.
This is probably why we parents stress so much about packing the lunches but we have to change it up a bit. They can’t eat chicken bites everyday. And even if they can, change up the protein and add different dipping sauces for more flavor and fun. Instead of a sandwich, try a tortilla wrap or tortilla wheel or circles. Try to change it up as much as possible. But do not introduce a brand new food in a lunchbox. Save these new foods for dinner time at home.
Here’s to a great school year!