It happened on a Wednesday and this was not my best day. I was doing some housework and cleaning and was in the laundry room upstairs. I don’t know what was going through my head because it happened so quickly. I was reaching for the detergent and knocked over the bleach. . which was left on the counter and OPEN and proceeded to spill everywhere. All over my clothes and the floor.
Insert many bad expletives here. Many.
I was fuming. So mad. My husband does his own laundry from time to time and left the bleach open. The cap was on but not closed. We’re talking nearly a full 3 quart (96 fl oz) jug of Clorox Bleach. Spilled everywhere. While I was cleaning it and inhaling the fumes, I thought. . OMG, this could be dangerous. And then I was mad again. Fuming mad. I wanted to call my husband and yell at him. Which would do no good and make him have a bad day but I wanted to call anyway. And then I looked up on the counter and saw this sticker.

A sticker that said, “My teacher prayed for me.” (I re-stuck this on Madeline’s back so you could see it)
At our church, Madeline attends the 2 year old Sunday school class. At the end of class while the kids are munching on gold fish crackers, the teacher volunteers go around the table and pray out loud for each child. And then they place this little sticker on their back. I think this is so lovely and special. Every kid needs to be prayed for. Always.
I was doing laundry a few days earlier and found the sticker on Madeline’s dress and for some reason, couldn’t throw it away and placed it on the counter. And now I know it was so I could see it again. On this Wednesday. After this crazy accident.
I thought about the meaning of this little sticker and my daughter, Madeline, and gained perspective and calmed down. I realized I was just tired and in a bad mood and probably PMSing. But that little sticker did it. Sometimes you just need a reminder or something to bring you back to reality. OR if you don’t have a “my teacher prayed for me today” sticker. COOKIES.
In the short time we have been here, WA has been really great. We honestly love it here. We have some very dear friends, Will and Victoria, with whom we alternate watching each others kids so the parents can go on date nights. We haven’t had a set-up like this ever. It’s brilliant. Also, our kids really love playing with each other and their twins, Alex and Abby (age 7) treat Phoebe and Madeline like their own sisters.

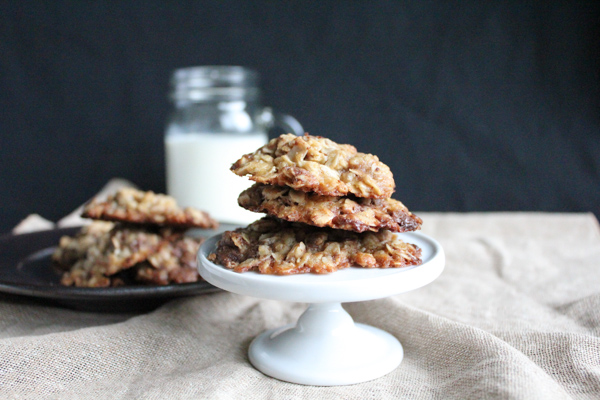
Abby is allergic to eggs so one day I made these Honey Oatmeal cookies for her (no eggs). She loved them and they soon became her favorite. The twins were here the other night for a play date/date night for their parents and I was making the cookies for Abby again. And she comes up with the brilliant idea: adding chocolate chips. She totally suggested this. Abby rocks. These cookies have become one of my favorites too.
What I LOVE about this recipe? No electric mixer needed. Just one pot and a little elbow grease. I hope you enjoy!
Moral of the story: I’m not letting my husband in the laundry room anymore. . hmmmm. . maybe he did this on purpose.

Honey Oatmeal Chocolate Chip Cookies
Ingredients
- 1½ cups 3 sticks unsalted butter, cut into chunks
- 1⅔ cups packed dark or light brown sugar
- ⅓ cup honey
- ⅛ teaspoon course sea salt + more for sprinkling if desired
- 4 cups old-fashioned rolled oats
- 1½ teaspoons baking powder
- 1¾ cups all purpose flour
- 2 cups chocolate chips use semi-sweet, milk or bittersweet
- sea salt; optional
Instructions
- Position your rack to the middle level in your oven and preheat to 325 degrees. Prepare a parchment paper or Silpat lined baking sheet.
- In a large saucepan or pot, melt the butter until fluid over medium-low heat, stirring. Remove from the heat and add in the sugar, honey and salt. Stir until well combined and smooth.
- Next, add the oats and baking powder. Stir well until well combined. Let sit for about 2-3 minutes so the dough can cool a bit.
- Stir in the flour until evenly incorporated and let sit again for about 5-10 minutes. Lastly, mix in the chocolate chips.
- Using 2 small spoons or a cookie scoop, scoop the dough and make 1½ inch mounds, spacing them about 2 inches apart on the cookie sheet. Gently press the dough balls down a bit and sprinkle a little sea salt on each one (this is optional but highly recommended).
- Bake the cookies for about 10-12 minutes or until the cookies are brown at the edges and lightly tinged on top. Watch them carefully to ensure they don’t burn. Transfer to a wire rack and let cool completely before removing.
Recipe adapted from Simply Sensational Cookies, the cookbook.

If you read my blog on a regular basis, you may have noticed the surge of posts (almost everyday) recently. I have a problem. When I’m feeling anxious or restless, I like to work or cook or bake to take my mind off things. I’m coming back to reality and don’t want my posts to become anything less than what I intend so I will be pulling back on the number of weekly posts. I promise.
For those who will continue to read my blog, I just want to say thank you. Thank you for taking the time. It really means a lot to me.


